
| 일 | 월 | 화 | 수 | 목 | 금 | 토 |
|---|---|---|---|---|---|---|
| 1 | 2 | 3 | 4 | 5 | 6 | 7 |
| 8 | 9 | 10 | 11 | 12 | 13 | 14 |
| 15 | 16 | 17 | 18 | 19 | 20 | 21 |
| 22 | 23 | 24 | 25 | 26 | 27 | 28 |
| 29 | 30 | 31 |
- ajax
- topologySpreadConstraints
- 예매로직
- terminationGracePeriodSeconds
- ES6
- 인생이재밌다
- AWS
- json
- sessionStorage
- spring
- git
- AWS Route53
- Kubernetes
- spread operator
- node.js
- Get
- 영화예매
- AWS RDS
- zombie-hit apartment
- jsp
- html
- Java
- MySQL Error
- chartjs
- javascript
- post
- mysql
- Bootstrap
- ssh
- mongodb
- Today
- Total
jongviet
April 1~28, 2021 - Front-end(JavaScript) 본문
#Front-end(JavaScript)
*4월1일~28일
-JS 두번째!!! 웹을 자유자재로 다루기 위해서는 JS는 매우 중요함!!
-Json, JS 필수 method, DOM, BOM 등.
*json 형태 값 정렬
-숫자값 : cars.sort(function(a,b) {return a.year - b.year} ); //특정 value값 기준 정렬
-문자값 : lowercase로 다 바꿔준 후 비교; 대소문자에 따른 아스키코드가 달라서 타입 일치 먼저 시켜야 함;
*문자 array 값 / join
-일반적인 comma는 fruits.toString();
-다른 문자 넣고 싶으면 fruits.join("*")과 같이 넣어서 구분해서 정렬 가능. 데이터 전송때 주로 씀;
*pop, push, shift 등 메소드
-pop은 배열 상 맨 마지막 값을 빼는 것;
-push는 맨 뒤에 넣는 것; 자주 사용
-shift는 맨 앞의 값을 빼는 것; 변수로 리턴 받아서 사용 가능함;
-unshift는 가장 앞쪽에 값을 넣는 것;
*slice
-fruits.slice(3); 특정순서부터 쪼개서 새로운 배열로 만듬; 원본에 영향 미치지 않음;
-fruits.slice(1, 3); 1자리부터 3번 자리 이전(1~2번)까지 뽑아서 새로 만들어줌;
-fruits.slice(); (0); 모두 전체 값을 가져옴, default가 0임.
-프로그래밍에 있어서는 항상 원본 데이터는 건드리지 말고 가져와서 써야함;
*Array iteration : forEach() / map() / filter () / reduce()
-callback function; optional method임!
-undefined 뜨는 건 리턴값이 없다는 것, 즉 넣을 값이 없기때문임;
-map은 필수적으로 알아두기, 많이 씀;
-다른 명칭 적용하면 기능 안함; 기능에 맞는 이름 써야함;
-map()
요는 반복을 통해서 특정 배열의 값을 가공하여 리턴해주는 것임; array, index, value를 모두 받아서 처리하는 것.
var numbers1 = [45, 4, 9, 16, 25];
var numbers2 = numbers1.map(myFunction);
function myFunction(value, index, array) {
return value * 2;
}
console.log(numbers2);
-filter()
-특정 배열 돌려서, 조건에 만족하는 것만 출력~?
var numbers = [45, 4, 9, 16, 25];
var over18 = numbers.filter(myFunction);
function myFunction(value, index, array) {
return value > 18;
}
-forEach()
-배열 내 값 순차적으로 가져와서 text 형태로 출력
var txt = "";
var numbers = [45, 4, 9, 16, 25];
numbers.forEach(myFunction);
function myFunction(value, index, array) {
txt = txt + value + "<br>";
}
-reduce()
-전체값을 sum해서 리턴
var numbers1 = [45, 4, 9, 16, 25];
var sum = numbers1.reduce(myFunction);
function myFunction(total, value, index, array) {
return total + value;
}
*forIn & forOf
-모두 끝까지 훑어봄;
//key는 forin으로 뽑는거임;
var person = {
fname: "John",
lname: "Doe",
age: 25
};
var text = "";
var x;
for (x in person) { //x에 key값 기준으로 전체 색인;
text += person[x].age + person[x].name; //x, 즉 key가 배열의 index number라고 생각하기;
//그렇게되면 내부 값을 가져오는게 말이 됨;
}
let cars = ["BMW", "Volvo", "Mini"];
let text = "";
for (let x of cars) {
text += x + "<br>"; // forOf는 있는 값 전체를 x에 담아서 빼옴.... object 형식일 시, x.name or x.age 형태로 빼면됨;
}
*this
-this는 기본적으로 object window
-script는 html임; script 내부의 JS 코드는 코드상 script 안쪽같아 보이지만, 실질적으로는 브라우저에 소속되어있음;
*scope
-local & global
-let이나 var안쓰고 선언하면 super global임... 권장 사안은 아님;
x = 5;
*객체 값 가져오기 예제
//일반 For문!
document.getElementById("output").addEventListener("click", function () {
let text = "<ul>";
for (let i = 0; i < resultArr.length; i++) {
text += "<li>이름 : " + resultArr[i].name + "</li><li>나이 : " + resultArr[i].age + "</li><li>인기도 : " +
resultArr[i].popul + "</li>
";
};
text += "</ul>"
document.getElementById("info").innerHTML = text;
});
//ForIn문!
document.getElementById("output1").addEventListener("click", function () {
let text = "<ul>";
for(let obj in resultArr) { // 본 변수에는 json으로 구성된 array에서 가져오는 것이기에, arrIdx 값임;
for(let key in resultArr[obj]) { // 이번 변수에는 key값들이 할당됨; 모든 object를 다 돌려서 값을 담은 다음에 나감;
if(key == "name") {
text += "<li>이름 : " + resultArr[obj].name + "</li>"
} else if (key == "age") {
text += "<li>나이 : " + resultArr[obj].age + "</li>"
} else {
text += "<li>인기도 : " + resultArr[obj].popul + "</li>"
}
}
}
text += "</ul>"
document.getElementById("info").innerHTML = text;
});
</script>
</body>
*국가명, 순위 입력받고, 순위 기준으로 오름차,내림차 정렬하여 출력하는 예제
<body>
<div>
국가명: <input type="text" id="country">
순위: <input type="text" id="rank">
<button id="input">입력</button>
<button id="asc">오름차순</button>
<button id="desc">내림차순</button>
</div>
<hr>
<p id="info"></p>
<script>
let resultArr = [];
//입력
document.getElementById("input").addEventListener("click", function () { //익명함수
//Object 형식으로 변수를 만드는게 중요... json 방식;
let con = {
country: "",
rank: 0
};
con.country = document.getElementById("country").value;
con.rank = document.getElementById("rank").value;
//값 가져오고 비우기
document.getElementById("country").value = "";
document.getElementById("rank").value = "";
resultArr.push(con);
console.log(resultArr);
});
*function 이름 따로 빼서 작업하는 법
document.getElementById("desc").addEventListener("click", sorting)
function sorting () {
//오름차 정렬
document.getElementById("asc").addEventListener("click", function () {
resultArr.sort(function (a, b) {
return a.rank - b.rank
});
let text = "<ul>";
for (let obj in resultArr) { // 본 변수에는 json으로 구성된 array에서 가져오는 것이기에, arrIdx 값임;
for (let key in resultArr[obj]) { // 이번 변수에는 key값들이 할당됨;
if (key == "country") {
text += "<li>국가명 : " + resultArr[obj].country;
} else if (key == "rank") {
text += "/ 순위 : " + resultArr[obj].rank + "</li>";
}
}
}
text += "</ul>"
document.getElementById("info").innerHTML = text;
});
//내림차 정렬
document.getElementById("desc").addEventListener("click", function () {
resultArr.sort(function (a, b) {
return b.rank - a.rank
});
let text = "<ul>";
for (let obj in resultArr) { // 본 변수에는 json으로 구성된 array에서 가져오는 것이기에, 모든 arrIdx 값임;
for (let key in resultArr[obj]) { // 이번 변수에는 모든 key값들이 할당됨;
if (key == "country") {
text += "<li>국가명 : " + resultArr[obj].country;
} else if (key == "rank") {
text += "/ 순위 : " + resultArr[obj].rank + "</li>";
}
}
}
text += "</ul>"
document.getElementById("info").innerHTML = text;
});
</script>
</body>
*각종 명칭
-bracket
-square bracket 대괄호 / curly bracket 중괄호 / parentheses 소괄호
-implicit casting
-hoisting 끌어올리기
*try/catch
-JS에서는 try/catch 잘 쓰지 않음;
*변수선언
-변수는 상단에 선언하고 내려쓰기~~
*strict
-"use strict";
-삽입, 삭제, 예약서 사용 등 안되게 철저하게 관리하는 개념; 상단 문구 넣으면 작동함.
*arrow functions
-지시선으로 표현하는 것.. 실제 가독성이 많이 떨어져서 권장하지 않음.
hello = () => "hello world
*class
-형태는 java와 같으나 실제 웹에서는 잘 쓰지 않음;
-constructor도 1개밖에 안만들어짐...
-생성방법은 같음;
-내부에서 메소드 만들때는 function age() 가 아니라 그냥 age()만 써서 만듬~
*JSON
-key와 value로 구성된 연속된 계층 구조;
{
"employees":[
{"firstName":"John", "lastName":"Doe"},
{"firstName":"Anna", "lastName":"Smith"},
{"firstName":"Peter", "lastName":"Jones"}
]
}
-서버로부터 데이터 받아서 처리, 직접 작성할 일은 거의 없음;
let obj = JSON.parse(text);
*DOM
-document object model;
-BOM : browser object model;

element.innerHTML = new html content;
element.attribute = new value; // value 값 변경 가능~
element.style.property = new style;
*d-day 계산 예제~
<body>
<div>
<p class="title">COUPLE STORY</p>
<div class="bt">
<div class="contents">
<p id="day">D-Day</p>
<p><img src="img.PNG" alt="" width="350px"></p>
시작일 <input type="date" id="date" required>
<button id="btn">결과보기</button>
</div>
</div>
</div>
<script>
document.getElementById("btn").addEventListener("click", function () {
//입력한 날짜
let data = document.getElementById("date").value;
let year = data.substr(0, 4);
let month = data.substr(5, 2) -1; //월기준
let date = data.substr(8, 2);
let dday = new Date(year, month, date);
//입력한 날짜 쉽게...
let dday = new Date(document.getElementById("date").value);
//현재 날짜 구하기
let now = new Date();
let gap = now.getTime() - dday.getTime(); // 현재 날짜에서 D-day의 차이를 구한다.
let result = Math.floor(gap / (1000 * 60 * 60 * 24)); // gap을 일(밀리초 * 초 * 분 * 시간)로 나눈다.
document.getElementById("day").innerHTML = "만난지 " + result + " 일째";
});
</script>
</body>
*로그인창이벤트 예제
-아이디/ 비밀번호 로그인창, 8자 이하면 로그인창 컬러 회색 / 8자 이상이면 컬러 파랑~
-text input 창 켜서 입력 자리 8자리 이상 되어야 색 변하는 이벤트!
-keyup이 젤 반응 실시간! = input도 반응 빠름;
addEventListener
-change
-click
-focus
-keyup, keydown
-load
-mousedown, out, over, move, up
-select
*getElementsByClassName / TagName
-배열형태로 불러오는 방식
-getElementsByName 함수를 이용할 경우, 배열방식으로 가져오기 때문에 반드시 [0] - 배열의 순서를 지정해야 한다.
->document.getElementsByName('btn')[0].addEventListener
*로그인창/아이디,비번 8자리 이상 시 활성화
document.getElementById("id").addEventListener("input", login); // param도 던질 수 있음, 추후 설명 예정
document.getElementById("pw").addEventListener("input", login); // 함수를 호출할때 callback 방식, 즉 함수명칭만 넣는 것... login()로 하지 않음!!!
function login() {
let id = document.getElementById("id").value;
let pw = document.getElementById("pw").value;
if (id.length >= 8 && pw.length >= 8) {
document.getElementById("button").style.backgroundColor = "rgb(44, 213, 157)";
} else {
document.getElementById("button").style.backgroundColor = "gray";
}
}
*refactoring:코드최적화 과정
-시중에 관련된 책 여러 권 있음. 중급자 이상 되었을 때 참조 필요함.
*나이에 따른 그룹핑 예제
-이름 / 생년월일(text) - 20010303 / 확인 button
-문자열코드는 계속해서 저장이 되어야함(배열 방식)
-미성년자 / 성인으로 출력;
-할인율, 혜텍, 요금책정 등 실무에서 쓰이는 방식
<body>
<form name="myForm">
이름 : <input type="text" name="username" id="un">
생년월일 : <input type="date" name="birth" id="birth">
<button type="button" id="btn">추가</button>
<button type="button" id="filter">필터링</button>
</form>
<hr>
<ol id="userList"></ol>
미성년그룹
<ol id="minor"></ol>
성인그룹
<ol id="adult"></ol>
<script>
let codes = [];
let minor = [];
let adult = [];
document.getElementById("btn").addEventListener("click", function () {
let userName = document.getElementById("un").value;
let birth = document.getElementById("birth").value;
birth = birth.replace(/-/g, ""); // 정규식, "-" -> ""로 처리; 하이픈->삭제 처리
let data = userName + birth;
if (Number(birth.substr(-8, 4)) < 2003) {
// 성인
adult.push(data);
} else {
// 미성년
minor.push(data);
}
codes.push(data);
let result = "";
for (let lis of codes) { //모든 내용 뽑아오는 for of, 내용이 담긴 lis
result += "<li>" + lis + "</li>";
}
document.getElementById("userList").innerHTML = result;
});
document.getElementById("filter").addEventListener("click", function () {
let result_minor = "";
let result_adult = "";
for (let lis of minor) {
result_minor += "<li>" + lis + "</li>";
}
for (let lis of adult) {
result_adult += "<li>" + lis + "</li>";
}
document.getElementById("minor").innerHTML = result_minor;
document.getElementById("adult").innerHTML = result_adult;
});
</script>
</body>
*DOM
println 역할 / 출력 테스트용 tag
-document.write
-document.writeln
-documnet.removeChild / appendChild / replaceChild 등.. 그냥 이해만 해놓기;
-let x = document.forms["frm1"]; = document.getElementById("frm1");
-x.elements[i].value // forms 안에 들어있는 모든 elements 가져오는 개념
-Document name 중심 form tag
-documnet.myForm.fname;
document.getElementById("image").src = "ki.jpg"; // tag가 가지고 있는 attribute를 수정 가능, background면, backgroundColor와 같음; 이미지변경
-append
-divs.append("string");과 같이 특정 공간에 삽입 가능함;
-deep copy
1)let newObj = JSON.parse(JSON.stringify(obj)); //객체가 자바스크립트 객체의 형태 key:value fair 형식;
2)obj.cloneNode(true); // true가 deepcopy옵션; 일반적인 JS 객체 대상;
*예제:카카오톡 메시지창!

<body>
<div class="wrapper">
<div class="header">
<img src="images/zombie_broken_bw.png" alt="" width="50px;" height="50px;">
<p>좀비</p>
</div>
<div class="body" id="body">
<div class="sender">grrrrrrrr</div>
<div class="sender">grrrrrrrr!!!</div>
<div class="sender">!!!</div>
</div>
<div class="bottom">
<textarea name="chat" id="chat" cols="40" rows="8"
style="width:330px; height:50px; resize: none;"
placeholder="메시지를 입력해주세요."></textarea>
<button id="btn" style="width: 62px; height:56px;">전송</button>
</div>
</div>
<script>
document.getElementById("btn").addEventListener("click", function () {
let p = "<div class=\"receiver\">" + document.getElementById("chat").value + "</div>";
document.getElementById("chat").value = "";
document.getElementById("body").innerHTML = document.getElementById("body").innerHTML + p;
document.getElementById("chat").focus();
});
</script>
</body>
-div내 스크롤
overflow-y: scroll;
overflow-x: hidden;
-입력 후 clear 및 focus 처리
document.getElementById("chat").value = "";
document.getElementById("chat").focus();
-textarea 조절 불가
resize: none;
-채팅창 메시지 하나 당 div 하나씩
-채팅창 메시지 컨텐츠 크기에 맞추기 / 말풍선 모양
border-radius: 10px 10px 10px 0px;
width: fit-content;
padding: 7px 7px 7px 7px;
-입력창 / button 공간 차지하는 것;
display: flex;
-div 균일하게 오른쪽에 붙게 하고 싶을 때, 채팅메시지
float: right;
clear: both;
*각종 event
<body id="body">
<button type="button" onClick="showAlert();">경고창</button>
<button type="button" onClick="intervalPrinting();">깜빡이</button>
<button type="button" onClick="stopInterval();">중지</button>
<script>
let id;
function showAlert() {
setTimeout(function () { //2초후에 내부 함수 발동
alert("경고창 2초 후");
}, 2000);
}
function intervalPrinting() {
id = setInterval(flash_night, 1000); //1초마다 해당 함수 발동
}
function flash_night() {
let elem = document.getElementById("body");
elem.style.backgroundColor = (elem.style.backgroundColor == "white") ? "deeppink" : "white";
}
function stopInterval() {
clearInterval(id); //setInterval을 clear!
}
</script>
</body>
*DOM navigation
-head와 body는 html을 부모로 가지고 있기에, parentnode, 상대는 childnodes(배열 형태);
-children과 childnodes와 다름; children이 좀 더 심플함;
-childNodes는 개행효과도 텍스트로 인식해버림; 하나의 기능적 역할을 하는 애들을 node;
-firstElementChild, lastElementChild; element 덩어리로 잡히지만, firstChild, lastChild는 li의 text까지 잡아버림, node 개념;
-개행 여부 확인 위해서는 text값 찾아야 하기에, element가 아닌 일반 써야함;
-subjectList.innerHTML / innerText(안에 있는 text 값만 가져옴)
-element, text 모두 하나의 node임.
-nodeValue / nodeName /
-HTMLCollection은 array 구조이긴하지만 실제 array는 아님!
-const = final 느낌, 상수 저장
*BOM
-윈도우 팝업창 열고 닫기; 실제는 모달을 훨씬 많이 씀;
function open_window(){
//window.open("url","name", "options[width=, height=, ....]")
myWindow = window.open("","myWindow", "top=100, width=400, height=400");
}
function close_window(){
if(myWindow) {
myWindow.close();
}
}
-브라우저 크기
screen.availHeight; / width
screen.Height / width
-현재 페이지 URL 확인 / 프로토콜
window.location.href
window.location.protocol
-경고창; 고객 서비스에는 안씀~
window.alert('hi');
-Cookies 객체
-1주일 간 방문 안함; 하루 간 띄우지 않음 등등;
-컴퓨터 기준 사용이기에 보안 이슈가 많았음...
-모바일 사용하는 추세; 폰은 혼자만 사용하는 기기이기에 cookies로 회기 중;
-쿠키 기술의 경우 손수 만드는 것 보다, 만들어진 API 가져다가 쓰는 것이 좋음.. 이미 최적화 되어 있음!
-마케팅 분야
브라우저 내 사용자의 모든 활동에 추적기를 심어둠, 버튼 몇번 누르는지, 언제 누르는지, 타고온 경로 등등..
*예제
-1~9의 숫자 중 각각 다른값으로 3개 뽑기; while문 / for문
let a = Math.floor(Math.random() * 9) + 1;
let b = Math.floor(Math.random() * 9) + 1;
let c = Math.floor(Math.random() * 9) + 1;
while (a == b || a == c || b == c) {
b = Math.floor(Math.random() * 9) + 1;
c = Math.floor(Math.random() * 9) + 1;
};
for (let i = 0; i < 3; i++) {
let rnum = Math.floor(Math.random() * 9) + 1;
if (numCheck[rnum] == false) {
numCheck[rnum] = true;
answerArr.push(rnum);
} else {
i--;
}
}
-배열1, 배열2 값 3개 연속적으로 비교; 야구게임;
let strike = 0;
let ball = 0;
let ansArr = [1, 2, 3];
let myNumArr = [6, 2, 3];
for (let i = 0; i < myNumArr.length; i++) {
for (let j = 0; j < ansArr.length; j++) {
if (myNumArr[i] == ansArr[j]) { // 값이 같으면 기본 ball 확보;
if (i == j) { // 자리까지 같으면 strike++;
strike++;
} else {
ball++; // 결국 값만 같았으니 ball++;
}
}
}
}
console.log("strike : " + strike + " / ball : " + ball)
-ForOf + ForIn으로 전체 값 빼내어 list 처리하기!
let lis = "";
for (let obj of ranker) {
lis += "<li>";
for (let key in obj) {
lis += obj[key] + " ";
}
lis += "</li>";
}
*pattern
-pattern="[1-9]{3}" // 1~9 숫자, 3자리
<input type="text" maxlength="3" pattern="[1-9]{3}">
-배열은 arr.toString()으로해야지 다 출력됨~
*input validation/유효성검사
-input value 버튼 비활성화 처리
-value / disabled value / disabled="disabled" or false;
*정규식 테스트; 정규식 변수에 담고, 변수.test(검사할값);
let onlyNum = /^[1-9]/g;
if(onlyNum.test(input)) {
}
-home키 코드 맨 앞줄로 이동
//유효성 검사 -> 숫자 3자리, 문자 X, 중복 숫자 x;
let input;
let arr = [];
document.getElementById("input").addEventListener("input", function () {
input = document.getElementById("input").value;
arr = [input.substr(0, 1), input.substr(1, 1), input.substr(2, 1)];
// 문자만
if (isNaN(input)) {
alert("숫자만 입력하세요.");
document.getElementById("input").value = "";
}
// 중복된 숫자x
if ((arr[0] != arr[1]) && (arr[1] != arr[2]) && (arr[0] != arr[2])) {
//숫자 3자리 이상
if (input.toString().length == 3) { // 숫자의 길이, maxlength="3";
document.getElementById("startBtn").disabled = false;
} else {
document.getElementById("startBtn").disabled = "disabled";
}
} else {
document.getElementById("startBtn").disabled = "disabled";
}
});
*checkbox
-target.checked;
-target.value;
-onclick="getValue(event);" // event가 실제 존재하는 객체임, 명칭 중요;
JAVA <input type="checkbox" name="subject" id="" value="JAVA" onclick="getValue(event);">
<h1 id="result"></h1>
function getValue(event){
let result = "";
if(event.target.checked){
result = event.target.value;
}else{
result = "";
}
document.getElementById("result").innerHTML = result;
}
-getValues(); // 복수개 가져오는 것; event 필요 없음;
function getValues(){
let selector = 'input[name="subject"]:checked';
let inputElems = document.querySelectorAll(selector);
let result = "";
for (let elem of inputElems) {
result += elem.value + " ";
}
document.getElementById("result").innerHTML = result;
}
*Radiobox
<div>
HTML5 <input type="radio" name="subject" value="HTML5">
CSS3 <input type="radio" name="subject" value="CSS3">
JS <input type="radio" name="subject" value="JS">
JAVA <input type="radio" name="subject" value="JAVA">
<button type="button" id="btn">체크된 값 가져오기</button>
</div>
<h1 id="result"></h1>
<h1 id="result2"></h1>
<script>
document.getElementById("btn").addEventListener("click",function(){
let subjects = document.getElementsByName("subject");
console.log(subjects);
//일반포문
for (let i = 0; i < subjects.length; i++) {
if(subjects[i].checked == true){
document.getElementById("result").innerHTML = subjects[i].value;
}
}
//forOf문
for (let sub of subjects) {
if(sub.checked == true){
document.getElementById("result2").innerHTML = sub.value;
}
}
});
</script>
*select-box
<!-- SELECTBOX안에 표시되는 값이 대문자, 잡혀서 RESULT에 들어오는 값이 VALUE --> // 일치 시키는게 좋을 듯!
<div>
<select name="" id="delivery">
<option value="택배선택" selected>택배선택</option>
<option value="cj">CJ</option>
<option value="lotte">LOTTE</option>
<option value="ems">EMS</option>
<option value="coupang">COUPANG</option>
</select>
<button id="btn">배송사</button>
</div>
<h1 id="result"></h1>
<script>
document.getElementById("btn").addEventListener("click", function() {
let delivery = document.getElementById("delivery");
let opt_sel = delivery.options.selectedIndex;
document.getElementById("result").innerHTML = delivery.options[opt_sel].value;
});
</script>
*split
-let arr = text.split(""); // 공백 기준으로 잘라서 배열에 하나씩 넣음;
*selector 3개에서 숫자 1~9까지 중 중복없이 3자리, 하나 뽑으면 그 자리는 선택안되게 하기;
-disabled 활용하여 1번~3번 값 순차적으로 입력하고, 입력된 창은 닫아주기;
-다시고르기 버튼을 통해서 모두 초기화
<select name="" id="first"></select>
<select name="" id="second"></select>
<select name="" id="third"></select>
//값 세팅
function setting() {
let arr = [1, 2, 3, 4, 5, 6, 7, 8, 9];
let text = "";
//전송 및 출력
document.getElementById("btn").addEventListener("click", function () {
let view =
document.getElementById("first").value +
document.getElementById("second").value +
document.getElementById("third").value
document.getElementById("view").innerHTML = view;
});
//다시고르기
document.getElementById("btn1").addEventListener("click", function () {
setting();
});
//값 세팅
function setting() {
let arr = [];
let text = "";
document.getElementById("first").innerHTML = "";
document.getElementById("second").innerHTML = "";
document.getElementById("third").innerHTML = "";
document.getElementById("first").disabled = false;
document.getElementById("second").disabled = false;
document.getElementById("third").disabled = false;
//첫번째 칸 1~9 세팅
document.getElementById("first").addEventListener("focus", function () {
document.getElementById("second").innerHTML = "";
document.getElementById("third").innerHTML = "";
text = "";
arr = [1, 2, 3, 4, 5, 6, 7, 8, 9];
for (let i = 0; i < arr.length; i++) {
text += "<option value=\"" + arr[i] + "\">" + arr[i] + "</option>";
}
document.getElementById("first").innerHTML = text;
});
//두번째 칸 발동
document.getElementById("second").addEventListener("focus", function () {
if (document.getElementById("first").value != "") {
document.getElementById("first").disabled = "disabled";
text = "";
index = document.getElementById("first").options.selectedIndex;
arr.splice(index, 1);
for (let i = 0; i < arr.length; i++) {
text += "<option value=\"" + arr[i] + "\">" + arr[i] + "</option>";
}
document.getElementById("second").innerHTML = text;
}
});
//세번째 칸 발동
document.getElementById("third").addEventListener("focus", function () {
if ((document.getElementById("first").value != "") &&
(document.getElementById("second").value != "")) {
document.getElementById("second").disabled = "disabled";
text = "";
index = document.getElementById("second").options.selectedIndex;
arr.splice(index, 1);
for (let i = 0; i < arr.length; i++) {
text += "<option value=\"" + arr[i] + "\">" + arr[i] + "</option>";
}
document.getElementById("third").innerHTML = text;
document.getElementById("third").addEventListener("change", function () {
document.getElementById("third").disabled = "disabled";
});
}
})
};
*JS class & inheritance
-react; vueJS 등을 연동해서 쓸 때 사용함;
-라이브러리 활용을 적극적으로 해야할 때 필요함;
-생성자 이름은 꼭 constructor로; init method와 같음;
-자바와 사용방법 거의 같음!
-상속도 자바와 같음
-class는 hoisting(아래에 선언된걸 끌어서 쓰는 것)이 안됨; 먼저 선언을 한 후에 사용해야함; function은 아래에 선언해도 위에서 끌어 써짐;
-static은 memory의 stack 영역에 올려서 공용으로 쓰는 것;
-JVM이 GC를 작동시켜서 heap을 항상 청소함; heap은 사용자영역;
-stackoverflow,,,, -> 내 메모리 한계를 넘었다... 즉, 문제를 나눠서 풀어보자. -> 모든 문제 해결 가능
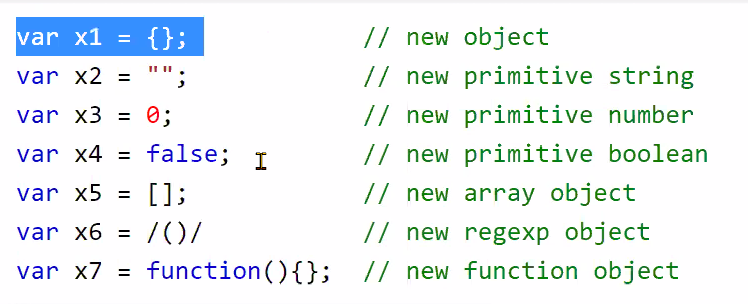
*JS Object
-class 개념 object + JS용 object가 있음;
-math, date, array 등 모두 객체 개념;
-js key & value, var person = {firstName : "John", lastName :"Doe"}; //프론트쪽은 이거 비중이 큼;
-class는 classification의 약어, 분류한다는 것임;
-JS에서 class는 활용도가 많이 떨어짐, 바로바로 화면에 반영하고 하는건데 전통적인 class는 이를 충족시키지 못함;
-구조를 갖춘 형태는 class를 써야함;
-literal 표현식, 표기법 느낌;
-객체는 순서와 길이가 존재 하지 않기 때문에 ForIn으로만 뺄 수 있음; 배열은 전통적 for문으로도 빼짐,, index값이 있기 때문;
-this 나름 감싼 소유주, 즉 부모객체;
-객체 내부 function 괄호 없이 호출하면 리터럴( {name: "Ki", age:31} ) 만 가져옴; 보안이슈가 있어서 잘 쓰지는 않음;
-toUpperCase(), split() 등 모두 object 내에 만들어져 있음;
-Json은 어디에서나 쓰일 수 있는 데이터 타입, string 형태로 보내고, key : value로 풀어서 사용함;
-form 태그 사용하여 회원가입
-배열 안에 객체 안에 배열 안에 객체; 4단계 정도가 멕시멈;
-json.stringify / json.parse;
let arr = [
{ "id": "1001", "type": "Regular" },
{ "id": "1002", "type": "Chocolate" },
{ "id": "1003", "type": "Blueberry" },
{ "id": "1004", "type": "Devil's Food" }
]
let a = JSON.stringify(arr);
console.log(a);
let b = JSON.parse(a);
console.log(b);
//펑션 객체..... function class, 명칭앞에 대문자;
-function Person(first, last, age, eye) {
}
-global object = static class
-new를 사용하면 주소값 배정까지해서 자리를 더 차지함; 하기와 같이 하면 temporary로 가지고있기만 하기에 이게 좋음;
-frontier들은 ES8까지 씀; 신기술 등등..
-form 태그 내용 받아서 -> 연산하고 -> html에 다시 출력하는 것만 해도 충분함;
*object를 배열안에 넣을 때 object 선언 자체를 특정 이벤트 안에 넣을 것!
let resultArr = [];
document.getElementById("input").addEventListener("click", function () { //익명함수
let a {
a : "a",
b : "b"
}
*창닫기
<button id="exit" onclick="exit()">종료</button>
//프로그램 종료
function exit() {
self.close();
};
'react & react native' 카테고리의 다른 글
| Oct 5, 2021 - react 관련 필기 (0) | 2021.10.05 |
|---|---|
| April 1~28, 2021 - Front-end(JavaScript) (0) | 2021.05.02 |
| April 1~28, 2021 - Front-end(Javascript) (0) | 2021.05.02 |
| April 1~28, 2021 - Front-end(CSS) (0) | 2021.05.02 |
| April 1~28, 2021 - Front-end(HTML) (0) | 2021.04.30 |

